此文翻译自谷歌官方文档。
ConstraintLayout是一个ViewGroup,它允许您以灵活的方式定位和调整小部件的大小。
注意:ConstraintLayout可用作支持库,您可以从API级别9(Gingerbread)开始在Android系统上使用。
目前有多种类型的约束提供使用:
- 相对定位(Relative positioning)
- 外边距(Margins)
- 中心定位(Centering positioning)
- 可见性行为(Visibility behavior)
- 尺寸约束(Dimension constraints)
- 链(Chains)
- 虚拟助手对象(Virtual Helpers objects)
在约束中不能存在循环依赖的关系,布局属性参考ConstraintLayout.LayoutParams类
开发人员指南
相对定位(Relative positioning)
相对定位是在ConstraintLayout中创建布局的基本构建块之一。这些约束允许您相对于另一个定位给定的组件。您可以在水平和垂直轴上约束窗口组件:
- 横轴:Left,Right,Start 和 End
- 竖轴:top,bottom和text baseline
一般作用是将一个组件定位到另外一个组件的一侧,比如,将按钮B定位到按钮A的右侧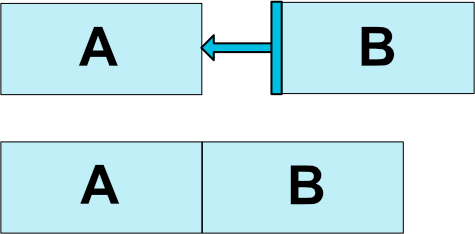
可以通过以下代码实现:
这告诉系统我们希望按钮B的左侧被约束在按钮A的右侧。这种位置约束意味着系统将试图使两侧共享相同的位置。
下面是一些可用的约束:
- layout_constraintLeft_toLeftOf
- layout_constraintLeft_toRightOf
- layout_constraintRight_toLeftOf
- layout_constraintRight_toRightOf
- layout_constraintTop_toTopOf
- layout_constraintTop_toBottomOf
- layout_constraintBottom_toTopOf
- layout_constraintBottom_toBottomOf
- layout_constraintBaseline_toBaselineOf
- layout_constraintStart_toEndOf
- layout_constraintStart_toStartOf
- layout_constraintEnd_toStartOf
- layout_constraintEnd_toEndOf
上面都是通过id引用的方式引用另外的组件,或者引用父容器(ConstraintLayout):
外边距(Margins)
如果设置了侧边距,它们将会应用到响应的约束中,强制两个组件之间保持间距。通常通过下列的属性可以设置:
- android:layout_marginStart
- android:layout_marginEnd
- android:layout_marginLeft
- android:layout_marginTop
- android:layout_marginRight
- android:layout_marginBottom
需要注意的是,边距只能为正数或者为0。
关联到设置为GONE组件时的边距
当位置约束目标的可见性为View.GONE时,还可以使用以下属性指示要使用的不同边距值:
- layout_goneMarginStart
- layout_goneMarginEnd
- layout_goneMarginLeft
- layout_goneMarginTop
- layout_goneMarginRight
- layout_goneMarginBottom
中心定位和偏置
ConstraintLayout的一个有用的方面是如何处理“不可能的”约束。例如,如果我们有类似的东西:
除非ConstraintLayout碰巧与Button具有完全相同的大小,否则两个约束不能同时满足(双方都不能是我们想要它们的地方。在这种情况下发生的是,约束像相反的力量一样拉动小部件分开;使得小部件将最终在父容器中居中。这对垂直约束同样适用。当遇到这样相反的约束时的默认值是使小部件居中;但是您可以使用bias属性来调整定位以使一侧偏向另一侧:
- layout_constraintHorizontal_bias
- layout_constraintVertical_bias
例如,下面将使左侧具有30%的偏置而不是默认的50%,使得左侧将更短,其中组件更倾向于朝向左侧
使用偏置,可以制作更好地适应屏幕大小更改的用户界面。
可见性行为(Visibility behavior)
ConstraintLayout具有对标记为View.GONE的窗口小部件的特定处理。GONE小部件,像往常一样,不会显示,也不是布局本身的一部分(即如果标记为GONE,它们的实际尺寸不会改变)。但是在布局计算方面,GONE小部件仍然是它的一部分,有一个重要的区别:
- 对于布局传递,它们的尺寸将被认为是零(基本上,它们将被解析为一个点)
- 如果他们对其他小部件有约束,他们仍然会被尊重,但任何边距将等于零
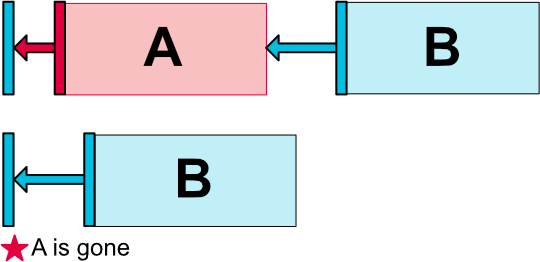
这种特定的行为允许构建布局,可以将窗口小部件临时标记为GONE,而不破坏布局(如上图),这在执行简单布局动画时尤其有用。
注意:所使用的边距将是B在关联到A时定义的边距(例如参见上图),在某些情况下,这可能不是您想要的边距(例如,A有一个100dp边缘的容器,B只有一个16dp到A,标记A为已失效,B将有16dp的容限)。因此,可以指定一个备用边距值,当关联到标记为已删除的窗口小部件时使用(参考上面的Margins属性)。
尺寸约束
对ConstraintLayout进行最小尺寸约束
可以为ConstraintLayout定义最小尺寸:
- android:minWidth设置ConstraintLayout的最小宽度
- android:minHeight设置ConstraintLayout的最小高度
当ConstraintLayout的尺寸设置为WRAP_CONTENT时,将使用这些最小尺寸。
组件的尺寸约束
可以通过以3种不同的方式设置android:layout_width和android:layout_height属性来指定窗口组件的尺寸:
- 使用特定尺寸(文字值,例如123dp或尺寸引用)
- 使用WRAP_CONTENT,这将要求组件计算自己的大小
- 使用0dp,这相当于“MATCH_CONSTRAINT”
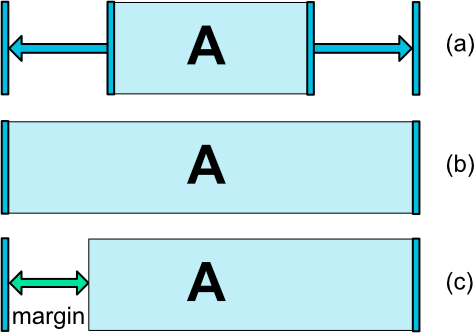
前两个工作方式与其他布局类似。最后一个将以匹配所设置的约束的方式(参见图7,(a)是wrap_content,(b)是0dp)来调整小部件的大小。如果设置了边距,它们将在计算中考虑(图7,(c)与0dp)。
注意:对于ConstraintLayout中包含的窗口小部件,不支持MATCH_PARENT,但类似的行为可以通过使用MATCH_CONSTRAINT定义,并将相应的左/右或顶/底部约束设置为“parent”。
比例(ratio)
可以将组件的一个尺寸定义为另一个尺寸的比例。为此,您需要将至少一个约束尺寸设置为0dp(即,MATCH_CONSTRAINT),并将属性layout_constraintDimentionRatio设置为给定的比率。例如:
将按钮的高度设置为与其宽度相同。
该比例还可以表示为:
- 浮动值,表示宽度和高度之间的比例
- 形式“宽度:高度”的比例
如果两个尺寸都设置为MATCH_CONSTRAINT(0dp),也可以使用ratio。在这种情况下,系统设置最大尺寸满足所有约束并保持指定的宽高比。基于另一个的尺寸约束一个特定边。您可以预先附加W,“或H,分别约束宽度或高度。例如,如果一个尺寸受两个目标(例如,宽度为0dp并以父级为中心)约束,则可以指示应限制哪一侧,通过在比率前面添加字母W(用于约束宽度)或H(用于约束高度),用逗号分隔:
将按照16:9的比率设置按钮的高度,而按钮的宽度将将约束匹配到父级。
链(Chains)
链在单个轴(水平或垂直)中提供类组行为。另一个轴可以独立约束。
创建一个链
如果一组组件通过双向连接(参见下图,示出了具有两个组件的最小链)链接在一起,则它们被认为是链。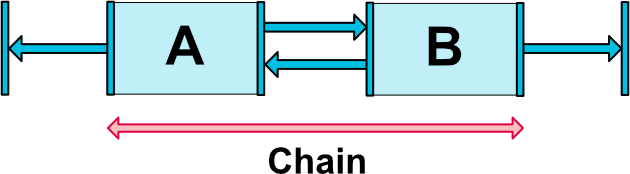
链的头部
链由链的第一个元素(链的“头”)设置的属性控制:
头是水平链的最左边的部件,垂直链的最顶部的部件。
链中的边距
如果在连接上指定边距,则会考虑这些边距。在展开链的情况下,将从分配的空间中扣除边距。
链的样式
在链的第一个元素上设置属性layout_constraintHorizontal_chainStyle或layout_constraintVertical_chainStyle时,链的行为将根据指定的样式(默认值为CHAIN_SPREAD)而更改。
- CHAIN_SPREAD - 元素将被展开(默认样式)
- Weighted chain - 在CHAIN_SPREAD模式下,如果某些窗口小部件设置为MATCH_CONSTRAINT,它们将拆分可用空间
- CHAIN_SPREAD_INSIDE - 与CHAIN_SPREAD类似,但链的端点不会展开
- CHAIN_PACKED - 链的元素将被包装在一起。然后子元素的水平或垂直偏置属性将影响打包元素的定位

加权链(Weighted chains)
默认行为链是在可用空间展开同样的元素。如果一个或多个元素使用MATCH_CONSTRAINT,它们将使用可用的空白空间(在它们之间平均分配)。属性layout_constraintHorizontal_weight和layout_constraintVertical_weight将控制如何使用MATCH_CONSTRAINT在这些元素之间分配空间。例如,在包含使用MATCH_CONSTRAINT的两个元素的链上,第一个元素使用权重2,第二个权重为1,第一个元素占据的空间将是第二个元素的两倍。
虚拟助手对象(Virtual Helper objects)
除了前面详述的内在功能之外,您还可以在ConstraintLayout中使用特殊帮助器对象来帮助您进行布局。目前,Guideline对象允许您创建相对于ConstraintLayout容器定位的水平和垂直准线。然后可以通过将它们限制到这样的准则来定位小部件。
Guideline
Guideline是ConstraintLayout的Guideline帮助器对象的实用程序类。辅助对象不显示在设备上(它们被标记为View.GONE),并且仅用于布局目的。它们只在ConstraintLayout中工作。
Guideline可以是水平或垂直的:
- 垂直Guideline的宽度为零,它们的ConstraintLayout父节点的高度
- 水平Guideline的高度为零,它们的ConstraintLayout父级的宽度
可以通过三种不同的方式定位指南:
- 指定从布局的左侧或顶部的固定距离(layout_constraintGuide_begin)
- 指定距离布局的右侧或底部的固定距离(layout_constraintGuide_end)
- 指定布局的宽度或高度的百分比(layout_constraintGuide_percent)
然后可以将组件限制为Guideline,从而允许从一个Guideline轻松定位多个组件,或者通过使用百分比定位来允许反应布局行为。
请参阅ConstraintLayout.LayoutParams中的属性列表以在XML中设置Guideline,以及在ConstraintSet中设置相应的setGuidelineBegin(int,int),setGuidelineEnd(int,int)和setGuidelinePercent(int,float)函数。
限制到垂直的Button示例Guideline:
ConstraintsSet
此类允许您以编程方式定义要与ConstraintLayout一起使用的一组约束。它允许您创建和保存约束,并将其应用于现有的ConstraintLayout。 ConstraintsSet可以通过多种方式创建:
- Manually
c = new ConstraintSet(); c.connect(....); - from a R.layout.* object
c.clone(context, R.layout.layout1); - from a ConstraintLayout
c.clone(clayout);
示例代码: